2.18.2021

Implement with Python serialize objects with JSON

 The json module exposes two methods for serializing Python objects into JSON format.

dump() will write Python data to a file-like object. We use this when we want to serialize our Python data to an external JSON file.

dumps() will write Python data to a string in JSON format. This is useful if we want to use the JSON elsewhere in our program, or if we just want to print it to the console to check that it’s correct.

Python and JSON do not share all the same types. Serialization will convert your Python objects into JSON format according to this table

PythonJSON
dictobject
list, tuplearray
strstring
int, long, floatnumber
Truetrue
Falsefalse
Nonenull

Both the dump() and dumps() methods allow us to specify an optional indent argument. This will change how many spaces is used for indentation, which can make our JSON easier to read.

json_str = json.dumps(data, indent=4)

10.18.2020

Differences You Must Know - REACTs ( React-Native and ReacJS )

Differences You Must Know - REACTs ( React-Native and ReacJS ) - Javascript Stack ...actual ! 

2 years since React-Native was developed and has become a very interesting framework as it can be used for Android and lets us build mobile apps across platforms.   Android and iOS possibility...

The company Facebook developed React.js to address its need for a dynamic, high-performance UI. Before going into the differences take a look at what is React Native and React.js for a better understanding. 

Going try show React Native and  React.js. ...or different choice of Javascript 


Defining..

React.js, also known as React or ReactJS, is a JavaScript library that is responsible for setting up a hierarchy of UI components or, in other words, for making UI components. It offers server-side and front-end support.

React Native is a JavaScript-based platform for developing native applications. React Native compiles native device components, allowing you to create native mobile applications.

React In React JS Development is known as the web platform’s base abstraction of React DOM, while React Native is still the foundation abstraction but of React Native. The workflow and syntax remain similar, but there are different components.

Register : React-Native does not render the app using HTML but offers alternative components which work similarly. 

One example below :


Those components form React-Native map the actual native components of iOS or Android UI that are rendered on the app. Most of the available components can be converted into something similar in HTML.

Because your code is not made in an HTML file, this also means that you will not be able to reuse any libraries you have previously used with ReactJS that make some form of HTML, SVG or Canvas accessible. Although for React-Native you might find alternative libraries, react.parts has a Native section for you to find whatever you need.

DOM not equal ...

React-Native does not render the app using HTML but offers alternative components which work similarly. Those components form React-Native map the actual native components of iOS or Android UI that are rendered on the app. Most of the available components can be converted into something similar in HTML.

Because your code is not made in an HTML file, this also means that you will not be able to reuse any libraries you have previously used with ReactJS that make some form of HTML, SVG or Canvas accessible. Although for React-Native you might find alternative libraries, react.parts has a Native section for you to find whatever you need.

Setup and bundling

React-Native is indeed a framework; on the other hand, ReactJS is a javascript library that can be used for your website. You’ll probably choose a bundler like Webpack when you start a new project with ReactJS and try to figure out which bundling modules you need for your project. React-Native comes with all you need, and you probably won’t need more. You will note how easy it is to set up when you start a new project: it’s very simple and you only have to run one command line in the terminal and you’re ready to go.

Animations and Gestures

You’ll need to learn a whole new way with React-Native to trigger the various components of your app with Javascript. Using the React-Native Animated API is the recommended way to animate a part. You can compare it with the famous Velocity.js library of Javascript. This allows different types of animations to be produced, timed or based on a speed associated with a movement and can be used with different types of Easing. You can do just about anything you’d do on the internet. React-Native also offers LayoutAnimation that is very cool and easy to use for transitions, but at this stage, it only works for iOS, as Android does not support it very well.

Platform-specific code

Understanding the user interface and the experience for iOS and Android may need to be different when you create a Native app. React-Native will identify the platform from which you run the code and load the correct code for the correct platform.

Dev Tools

You get a few developer tools out of the box from React when you start a new native project without installing anything. Working with React-Native is also the beauty of being able to use most of the developer tools that you use with ReactJS. 

Chrome Dev Tools works fine for inspecting network requests, viewing console logs, and stopping debugger statements code.

Publishing

If you are developing an app for both Android and iOS, you will have to understand how to work with Xcode and Android Studio to ensure that everything is properly set up before your app is first deployed to the App Store or Google Play. With iOS, it functions just like you’re going to install a standard native app, though you’ll have to obey the React advice to sign your APK before uploading it to Google Play with Android.

Navigation

React-router is a well-known library that uses most web applications to transition between pages. Navigator is another feature that React-Native provides. Most mobile apps don’t have plenty of scenes going in every direction like would do a web app, the Navigator component even though it might seem a bit complicated to use at first will provide you everything you need to manage the transition between scenes.

React Native helps you develop complex user interfaces faster than ReactJS and usually works well for both iOS and Android. 

ReactJS to React-Native learning curve is quite easy, especially if you like to learn new Javascript frameworks.

Any doubts :  https://reactnative.dev


8.13.2020

React Native or Flutter ? Regah ?

 React Native And Flutter Similar?  Regah... !

  1. React Native uses UI components while Flutter uses widgets to give an excellent user experience on both iOS and Android platforms
  2. Both are cross-platform frameworks which can help in creating apps for both iOS and Android.
  3. Both React Native and Flutter come from tech giants. Facebook backs React Native while Google has launched Flutter.
  4. Both the frameworks have an active community of developers backing them.
  5. Both are #OPEN SOURCE frameworks. They are also free and help in the fast development of cross-platform apps.
  6. They both help APP Development firms create amazing apps very fast because of their native activities, REALLY FACT !
  7. Communities of both frameworks are trying their best to keep the documentation updated.
  8. Both the frameworks support hot-reloading which helps in making changes and viewing them without recompiling or restarting.

#REACTNATIVE is Framework  
#FLUTTER is Framework

The Differences Between React Native And Flutter

Programming Language

  1. React Native uses JavaScript for developing an app. It is a very popular language that developers use widely.
  2. Flutter uses Dart which is also developed by Google. It uses the features of several languages of today.
  3. There are no JavaScript elements or pattern in Dart. It is easy for people who are used to Java and C++.
  4. There is no separation of data files, templates or style.

Stability and Flexibility

  1. React Native offers users an excellent experience by direct communication with the native platforms.
  2. Flutter uses widgets for engaging user experience.
  3. React Native occupies the first position while Flutter is trying to gain top spot because it is still a new framework.

App Development Time

  1. React Native allows the use of third-party libraries and readymade components for the fast building of an app.
  2. Flutter uses a set of high-performance widgets to create a mobile app in lesser time than it takes for native applications.  Flutter is one flow different ... React Native one flow to old and news developers with designer images..

Performance

  1. Flutter is a clear winner here due to its simplicity. The JavaScript layer enables communication with native elements faster.
  2. With Flutter, you can use the code again. React Native is slightly less suitable due to its architecture.
  3. While both are good, Flutter has a slight advantage due to the Dart language.

IDE and Coding

  1. Flutter is a new framework. Android Studio/IntelliJ and Visual Studio Code support it.
  2. React Native is an old language and almost all IDEs support the framework.
  3. If you want to use Flutter, you have to learn Dart, while you can use React Native if you know JavaScript, which is a very popular language.
  4. DART is one language liked C++ with insight java
  5. JAVASCRIPT well is JAVASCRIPT ...remember NETSCAPE !   Javascript was born in INTERNET ! DART NO !    FACT !   

3.16.2020

Serveless !? New buzzword ?


Serverless, the new buzzword in town has been gaining a lot of attention from the pros and the rookies in the tech industry, sounds relieving though, knowing a lot of your daylight hours go into implementing, maintaining, debugging, and monitoring the infrastructure. 
With all of that infrastructure heavy lifting out of the way, we really can focus on the business goals our applications serve. A lot of productive efforts could be channeled in the right direction, where they were meant to be ideally. Maybe it sounds too good to be true, but this is the way things should have been. At least for those of you who cant afford to spend a lot of time caught up in the web of intricacies in modern complex infrastructure.
Expectations apart, Serverless is really breaking ground in its path to disrupt your server infrastructure. Serverless is already used in production by companies like Netflix, Reuters, AOL, and Telenor. Industry-wide adoption is constantly increasing. Serverless is all set to take up its own place, but don’t expect Serverless to conquer your infrastructure completely. There will be use cases where serverless might prove to be the wrong choice.

So, What is Serverless?

Serverless is a cloud computing execution model where the cloud provider dynamically manages the allocation and provisioning of servers. A serverless application runs in stateless compute containers that are event-triggered, ephemeral (may last for one invocation), and fully managed by the cloud provider. Pricing is based on the number of executions rather than pre-purchased compute capacity, isn’t it the ideal framework for that project you have been planning since a long time? Well, go ahead do it.

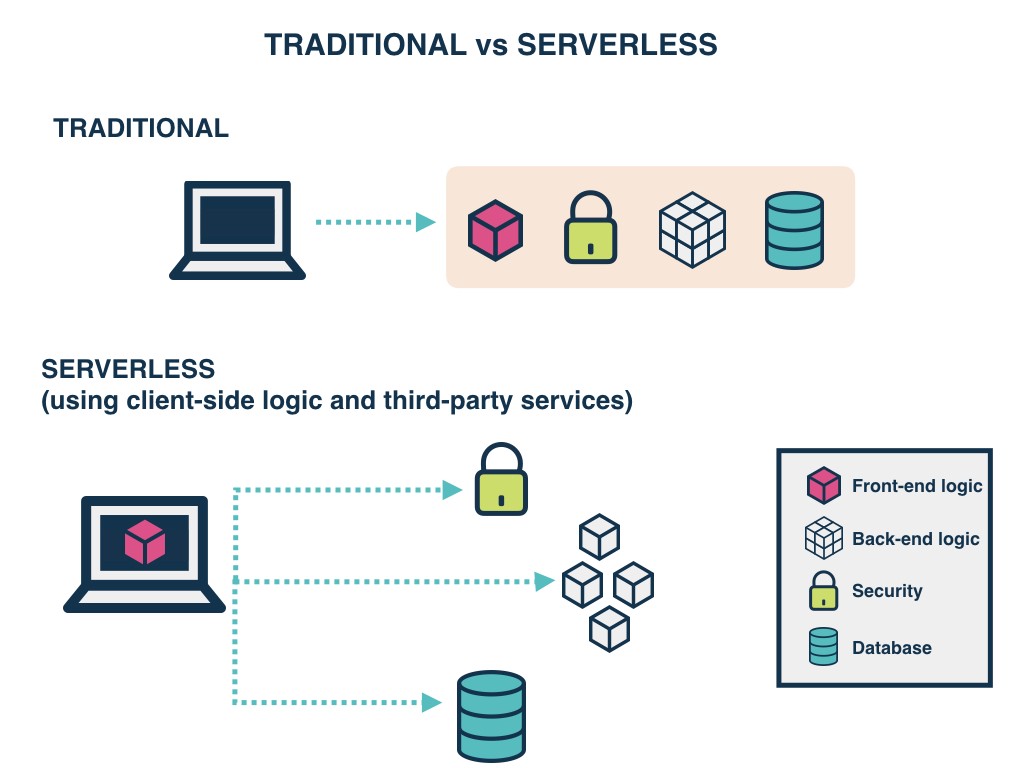
Serverless applications are event-driven cloud-based systems where application development rely solely on a combination of third-party services, client-side logic and cloud-hosted remote procedure calls (Functions as a Service).
Most of the cloud providers have invested heavily in serverless and thats a lot of money; 

Principles of FaaS:

  • A. Complete management of servers
  • B. Invocation based billing
  • C. Event-driven and instantaneously scalable


SERVERLESS picture base
Pic source : https://www.gocd.org/2017/06/26/serverless-architecture-continuous-delivery/


2.13.2020

Quer publicar no Apple Store ?

Quer publicar no Apple Store ?

A. Amram Duque - ad@hamechcode.co


Forma / Programa de desenvolvimento da Apple: 

Apple Developer Program

Primeiramente, você precisa se registrar no Apple Developer Program, como desenvolvedor.
Neste programa, você poderá utilizar ferramentas adicionais da Apple, ver as principais estatísticas do seu aplicativo.
Pague pela inscrição
Você não conseguirá se inscrever sem despesas. O registro no programa da Apple só é possível dessa forma.
Se você é um empreendedor individual, ou possui uma empresa com até um funcionário, serão cobrados $99 dólares anuais pela inscrição. Se você possui uma equipe de desenvolvimento, a inscrição custará $299 dólares anuais. Assim, todo o seu time de desenvolvimento terá acesso a mesma conta.

Faça testes detalhados do seu aplicativo

Se você criou o aplicativo, o trabalho ainda não terminou. Afinal, você precisa planejar o lançamento do seu aplicativo na App Store de forma inteligente.
Mesmo que o seu processo de desenvolvimento seja bem feito, não significa que seu aplicativo não tenha pequenos bugs.
Sendo assim, é absolutamente necessário que você teste seu aplicativo detalhadamente. Assim, você pode entender se seu aplicativo esta funcionando da melhor forma, sem bugs ou erros.
Além disso, existem vários dispositivos com iOS, então, quantos mais dispositivos forem usados para testes, melhor para o seu aplicativo.
Você poderá ter certeza que seu aplicativo cabe e se adapta a todas as telas, algo que você não conseguirá fazer em um simulador de iOS.
E, mesmo que a equipe de avaliação da Apple não encontre os bugs do seu aplicativo, não significa que seus usuários ficarão satisfeitos com tudo. Sendo assim, tenha certeza que eles possam ter a melhor experiência.

Não ignore as regras principais.

A Apple disponibiliza todos os guias e documentos necessários para que os desenvolvedores encontrem todas as informações importantes. Infelizmente, alguns desenvolvedores acabam ignorando as principais regras, fazendo com que seus aplicativos sejam rejeitados.
Nesse artigo, resolvemos te ajudar a entender as principais regras, para que você não as deixe passar despercebidas:
  • Seu aplicativo deve passar por um teste de erro;
  • O uso de APIs privados é impossível;
  • Não pode ser um clone de um aplicativo nativo pré instalado no sistema;
  • Deve conter a ferramenta de compras in-app integrada;
  • A câmera ou o microfone do smartphone não podem ser utilizados sem a permissão do usuário;
  • Seu aplicativo deve utilizar apenas artes próprias, ou deve ter as devidas permissões para utilizar artes alheias.
A lista não é tão grande, mas seguir essas simples regras consegue te ajudar a publicar seu aplicativo sem nenhum grande problema.

ID do App

Qualquer aplicativo requer uma identificação única na App Store. A Apple oferece dois tipos de ID – explicito e wildcard. Você pode desenvolver e instalar um grande número de aplicativos com um ID wildcard. Mas, se você deseja utilizar o iCloud, ou ferramentas espefícias do iOS, como as notificações push, você vai precisar de um ID explícito. Sendo assim, escolher a ID correta é muito importante.

Distribuição

Para ter certeza que seu aplicativo estará disponível para um tipo específico de dispositivo ou versão de iOS, você precisa conseguuir um certificado de distribuição autorizado pela Apple.
Para conseguir, você precisa enviar uma solicitação e esperar a aprovação da Apple. Você deve estar logado em sua conta de desenvolvedor da Apple.
Ao receber seu certificado de distribuição, você deve criar um perfil de provisionamento próprio, assim além de comprovar sua identidade, você e sua equipe poderão utilizar e testar o aplicativo em um iPhone ou iPad.

Assinatura do código

Após estes procedimentos, você precisa realizar a assinatura do código. Mas, o que é isto? Você precisa configurar as opções no Xcode, e passar pela assinatura do código.
Esta é uma tecnologia de segurança do macOS, que certifica que seu aplicativo foi criado por você.
Essa tecnologia pode identificar quaisquer mudanças feitas por você ou terceiros, e lhe enviará uma notificação.
Se algum malware tentar infectar seu aplicativo, você saberá imediatamente.
No total, este processo parece bem difícil de sere realizado de primeira, mas, depois de um tempo, você pega o jeito.

Alvo de implantação (Deployment target)

Você não pode ignorar o alvo de implantação de desenvolvimento de seu aplicativo. Esta configuração também é importante. Quando você cria um projeto no Xcode, seu aplicativo tem um alvo na implantação – ele indica qual a versão mais antiga do sistema operacional é capaz de rodar seu aplicativo.
É tudo bastante simples, mas há algo importante a ser considerado: quando você terminar de publicar seu aplicativo na Apple, você deve modificar o alvo de implementação de modo cuidadoso.
Se você pretende aumentar a implementação de seu aplicativo em uma nova atualização, quando seu aplicativo já estiver disponível para usuários, alguns deles não conseguiram utilizar seu aplicativo, por estarem utilizando uma versão de sistema operacional mais antiga. Consequentemente, você perderá parte de seu público, e pode receber feedbacks negativos quanto a isto.

Envio do aplicativo: siga as regras a App Store

Seu aplicativo será publicado. Complete alguns passos para completar esta etapa!

Otimização do ícone

Seu aplicativo não pode existir sem um ícone, e você, ou seu designer, deve criar um ícone atrativo para seu aplicativo.
Tenha em mente que o tamanho de seu ícone deve estar de acordo com as demandas da Apple.
Os principais requisitos da Apple a respeito do tamanho dos ícones se encontram no site oficial.

Capturas de seu aplicativo

Você deve produzir pelo menos 5 capturas de seu aplicativo e pelo menos uma pré-visualização. Se você criar um aplicativo para vários dispositivos, você precisará fornecer capturas de tela de todos eles.
É muito importante que esse passo seja cumprido, quando você estiver publicando seu aplicativo iOS na App Store, já que suas capturas de tela podem impactar diretamente na decisão final de seu público.
Ou seja, as capturas de tela também podem afetar se as pessoas serão ou não usuárias de seu aplicativo.

Metadados

Seu aplicativo deve possuir uma descrição detalhada, com todas as informações necessárias. Os dados são os seguintes:
  • Nome do aplicativo;
  • Número da versão do aplicativo;
  • Escolher a categoria do seu aplicativo;
  • Produzir uma descrição detalhada;
  • Adicionar palavras-chave.
Esse é um dos principais passos a ser seguido para publicar seu aplicativo iOS na App Store.

O começo da publicação

Ao completar todas as ações acima, você deve criar seu aplicativo no iTunes Connect.
Aqui, você deve utilizar as informações de sua conta de desenvolvedor, preencher o formulário e adicionar o novo aplicativo.

1. Adicione o nome do seu aplicativo;

É recomendado que o nome do seu aplicativo seja igual ao nome abaixo do ícone na tela inicial;

2. Adicione seu número SKU/ID do Bundle;

O número SKU é um tipo de código que faz com que seja possível identificar seu aplicativo na App Store. O desenvolvedor pode criar este código sozinho.
Quando ao Bundle ID, você só precisa selecionar o ID do aplicativo que você escolheu (explícito ou wildcard) no menu. Só isso.

3. Adicione o custo de seu aplicativo

Apenas adicione o preço e escolha quais lojas que seu aplicativo estará disponível. Se você quiser mudar isso depois, sendo no preço ou na disponibilidade, você pode fazê-lo no iTunes Connect a qualquer momento, sem precisar criar nenhuma atualização.

4. Faça o upload do seu aplicativo

Você começará criando um arquivo, quando preparar a publicação de seu aplicativo iOS.
O arquivo deverá ser criado utilizando o seu dispositivo iOS, conectado ao Mac que você utiliza.
Depois disso, você deve encontrar o arquivo no Menu do Xcode. Se tudo tiver sido feito da forma correta, o organizador do X code abrirá seu arquivo normalmente.
Selecione o arquivo e clique no botão Upload To App Store. A versão binária do aplicativo será enviada para os servidores da Apple. Lá, seu aplicativo será validado, e, se houver algo errado, ocorrerá um erro.
De qualquer forma, isso deverá te ajudar a corrigir todos os erros antes que ele chegue as mãos do time da apple para avaliação.

5. Processo de avaliação

Depois da verificação inicial, você conseguirá verificar o status atualizado como Waiting for Review. Normalmente, são necessários por volta de 7 dias para que seu aplicativo seja avaliado.
Se você desenvolveu um aplicativo sólido e fez bons teste, seu aplicativo não falhará nesta etapa.

Porque seu aplicativo foi rejeitado

Agora, vamos falar dos principais motivos que podem causar a rejeição na publicação de um aplicativo na App Atore.
Esta parte do texto vai te ajudar a evitar erros comuns, fazer com que seu aplicativo seja agradável ao público, e completar o envio de seu aplicativo da melhor forma.

Bugs e falhas

Você deve testar seu aplicativo detalhadamente antes de enviá-lo para publicação. Se ele conter quaisquer erros ou falhas constantes, o time de avaliação irá rejeitá-lo. Além disso, tenha certeza que seu aplicativo não contém nenhum link quebrado ou corrompido.

A presença de conteúdo inútil

Isso significa que seu aplicativo não pode conter nenhum aplicativo que não tenha nenhuma funcionalidade. Termine seu aplicativo com calma antes de enviá-lo para publicação.

Falta de informação

Quando você estiver publicando um aplicativo iOS na App Store, tenha certeza que seu aplicativo tenha toda a informação necessária, como uma descrição detalhada e fotos ou vídeos demonstrativos. Se houverem configurações especiais a serem realizadas, considere adicioná-las a especificação do aplicativo. Se você resolver esta etapa de forma inteligente, tudo ocorrerá da melhor forma.

UI inadequada

A interface de uso (UI) deve ser bem pensada e focada na usabilidade, então desenvolva de forma consciente. A Apple possui requisitos estritos quanto a interface de uso de um novo aplicativo, então tenha certeza que o seu software tenha tudo que é necessário.

Fraudes

Seu aplicativo deve conter exatamente aquilo que anuncia, para não confundir ou enganar os usuários. Se isso não acontecer, ou se as funções não forem especificadas na descrição oficial, esteja preparado para revisar seu aplicativo e reenviar para publicação. Ele será rejeitado.

Aplicativos similares

Se você criar vários aplicativos para serem publicados na App Store, tenha certeza que seus aplicativos não têm funções iguais ou muitos parecidas, ou todos eles serão rejeitados. Além disso, se o seu aplicativo é um tipo de clone de algum aplicativo já publicado na App Store, ele também será rejeitado. A Apple irá oferecer que você desenvolva um aplicativo combinando todas a ferramentas encontradas em todos os seus apps similares.
Aplicativo de baixo-custo
Mesmo que seu aplicativo obedeça todas as principais regras da Apple, e não exista nenhuma violação séria, ele continua passível de rejeição. O aplicativo deve conter algo novo para o mercado de aplicativos iOS, e se conter códigos e desenvolvimento medíocre, ou se for criador para um público muito limitado, ele será rejeitado.
Além disso, tenha certeza que seu aplicativo contenha o identificador de anúncios, se você planeja adicioná-los a seu app. No fim, teste se seu identificador de anúncios funciona de forma correta, pois se os anúncios não forem exibidos corretamente, o aplicativo também será rejeitado.

Resultado / Conclusão

Se você deseja saber como publicar seu aplicativo na App Store, você tem todas as principais informações nesse texto. 
De qualquer forma, a principal dica é: desenvolva da melhor forma e fique atento as regras da Apple.

1.22.2020

Good Platform = (Bitcoin + Blockchain )*HighTech Software+OpenSource/securityDistributed

Here's why it matters from a policy perspective... about Blockchain with open source software 
The computer code undergirding each major cryptocurrency and open blockchain project is developed as open source software. Regulators and policymakers looking into cryptocurrencies but unfamiliar with open source software may have an incorrect mental model: one wherein software-based systems are (and must be) developed by one or a handful of for-profit companies. While plenty of important software projects are developed in this way (e.g. Microsoft’s Windows or Oracle’s RDBMS), open source projects are different and that difference can and should help shape public policy.
Open source software is collaboratively produced, shared freely, published transparently, and developed to be a community good rather than the property or business of a single company or person. When a project is developed open source there isn’t a single chokepoint in the development process, no company or individual that makes, owns, and sells the software. Just as there is no single company that powers the Bitcoin network, neither is there one company that makes the software that, when run on internet connected computers, creates that network. This decentralization in technology production has several profound benefits and can be difficult to grasp for those not familiar with software development.
To better understand the power and nature of open source, it is helpful to first understand a bit about one particularly successful piece of open source software: Linux, the open source operating system.
Good Platform = (Bitcoin + Blockchain )*HighTech Software+OpenSource/securityDistributed 


9.09.2019

Supervised and Unsupervised machine learning techniques


One of the main questions I hear in Artificial Intelligence (AI) classes is about what it is and when to use supervised and unsupervised machine learning techniques.
Today these questions are asked by non-programmers or beginners, because the amount of information on what supervised learning is and how to implement really has to be accessible to those who know or who know and have experience.
These terms imply that they are different models.
Making a metaphor, imagine students being supervised by a teacher who passes a specific goal or target and shows several examples so that they can have a direction on how to learn to perform their task to better reach the target. In the unsupervised, the teacher gives examples, but does not indicate the target to be reached. Students are free to draw their conclusions from the examples.
These techniques address different problem solving.
Which one to use will depend on the business objective.

TARGET :  BUSINESS OBJECTIVE


AI within DDD ( Domain Driven Development )

In some projects  I've participated in, and even created and built directly, I always thought about automating the generation of compone...